Subnetwork🔗
Introduction to Subnetwork
This section provides information about Subnetworks, whose addressing and DHCP behaviour are managed by the NACVIEW system. A Subnetwork is a term related to a range of IP addresses, extended with additional information related to a specific network segment. In addition to the network address and subnet mask, this information includes: a name, a colour identifier, enabled status, an optional description, detailed DHCP configuration, associated VLANs, and administration groups. All this information is important in the process of deciding how devices connecting within a given network segment are addressed and granted access to the enterprise network.
System context: Subnetworks can be created individually (Add) or imported in bulk from a CSV file (Import). The list of subnetworks can also be exported to a file (Export). Each subnetwork is identified by its Network IP address and CIDR prefix, and can optionally be linked to one or more VLANs and to Administration groups allowed to manage it.
Operational Example: When a new device connects within a subnetwork that has DHCP enabled, NACVIEW hands out an address from that subnetwork’s pool according to its DHCP configuration (e.g. lease time and any applicable DHCP option set). If its MAC address belongs to a DHCP blacklist, it is denied a normal address and placed under the applicable restriction, such as quarantine.
Toolbar🔗
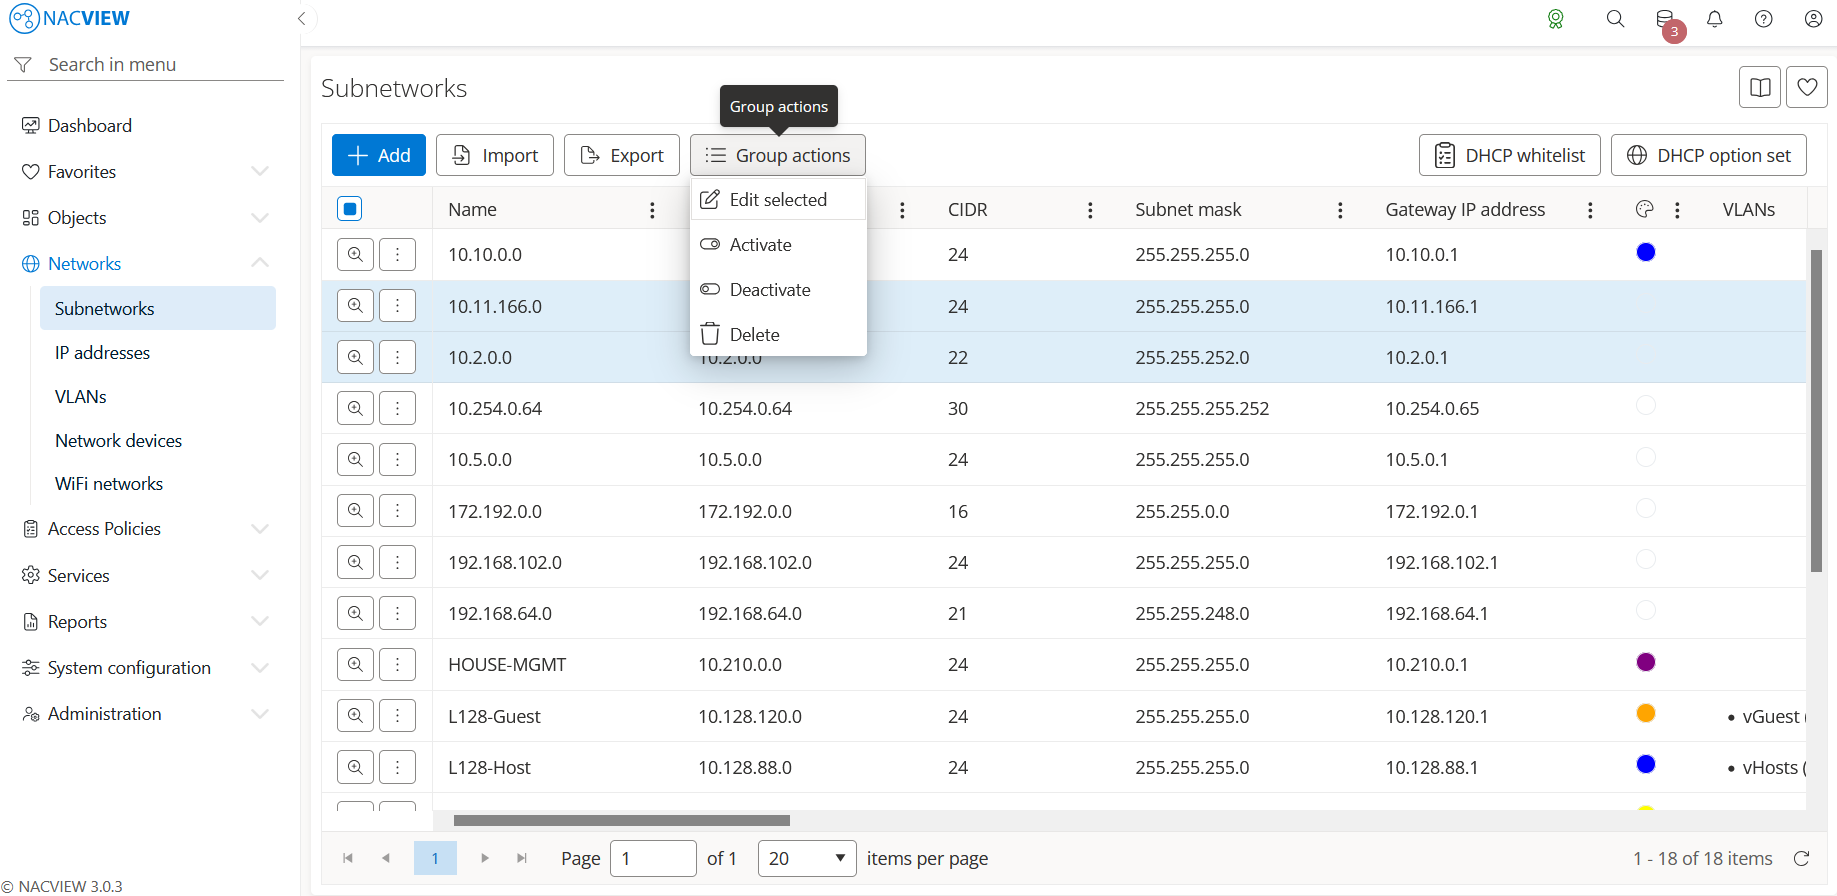
Add button is used to manually add a single new subnetwork.
Import button is used to import multiple subnetworks into the local NACVIEW database, e.g. from a CSV file.
Export button is used to export the list of subnetworks from the NACVIEW database to a file.
Group actions button is used to perform an action on multiple selected subnetworks at once.
Subnetworks can be selected by holding the Ctrl or Shift key while clicking. The
available actions are: Edit selected, Activate, Deactivate, and Delete.
DHCP whitelist button is used to open the list of DHCP whitelists.
DHCP option set button is used to open the list of DHCP option sets.
The Subnetworks list displays, for each entry: Name, Network IP address, CIDR, Subnet mask, Gateway IP address, its colour identifier, the associated VLANs, the date it was created (Created at), Description, and its enabled status.
The subnetwork details panel🔗
The subnetwork details panel opens when a specific subnetwork is selected from the list (Details). It displays all information about the selected subnetwork in one place, in read-only mode. The top of the panel contains action buttons for the selected subnetwork (Edit, Migrate, Resize, New IP address, IP matrix, and Archive available under the more options menu), while below them the full set of the subnetwork’s attributes is shown, including creation data (Created by), identification data (Name, Netmask, CIDR, Network IP address, Gateway IP address, Broadcast IP address), descriptive attributes (Color identifier, Description), status (Is enabled, DHCP enabled), DHCP configuration (Primary DHCP DNS, Secondary DHCP DNS, DHCP dynamic lease time, DHCP monitoring decline overload, DHCP monitoring overload, DHCP static lease time, DHCP usage, DHCP auto link, DHCP ignore VLAN request, DHCP monitoring), and ARP and routing settings (ARP managed, ARP VR name, Primary routing network device, Secondary routing network device).
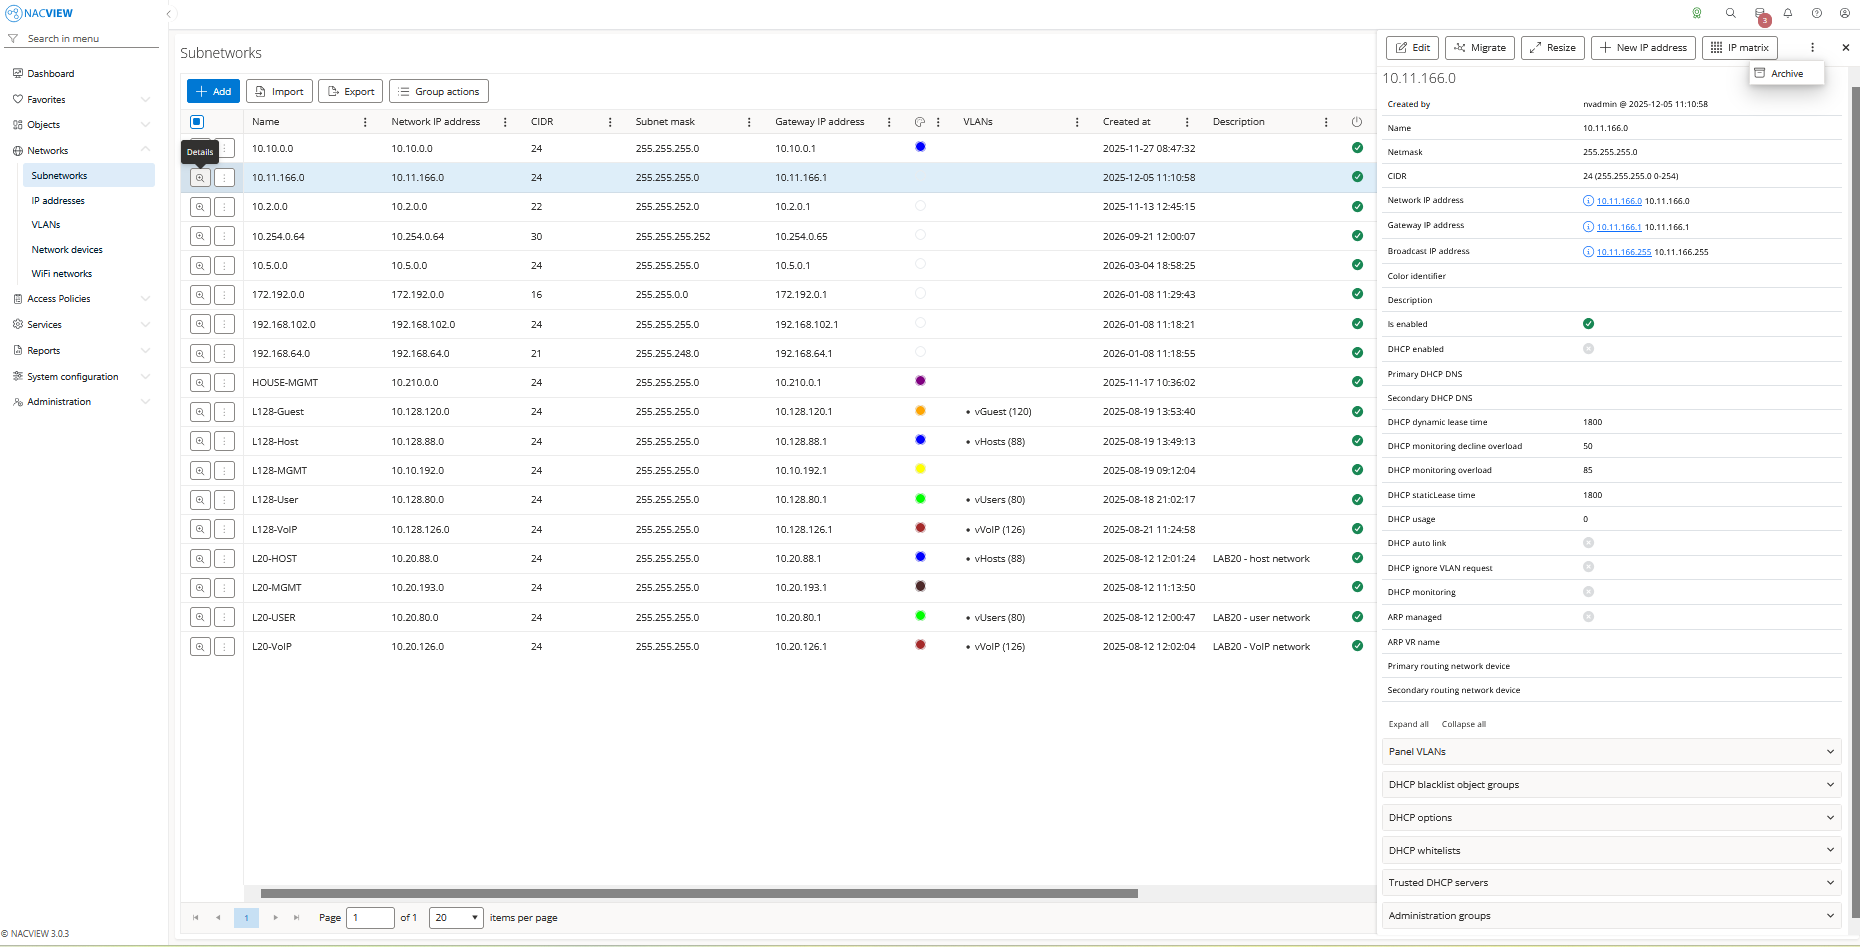
Edit button is used to edit the attributes of the selected subnetwork.
Migrate button is used to migrate the selected subnetwork to a different network address range.
Resize button is used to change the size (CIDR/subnet mask) of the selected subnetwork.
New IP address button is used to manually add a new IP address within the selected subnetwork.
IP matrix button is used to display a matrix view of the IP addresses within the selected subnetwork, showing which are allocated and which are available.
Archive button, available from the more options menu, is used to display the archive records related to the selected subnetwork, showing when each record was created, by whom, from which IP address, and the object name and type.
Panels🔗
The following expandable panels are available at the bottom of the right-hand side of the details view:
VLANs - shows the VLANs associated with this subnetwork.
DHCP blacklist object groups - shows the object groups excluded from DHCP for this subnetwork.
DHCP options - shows the DHCP options configured for this subnetwork.
DHCP whitelists - shows the whitelist of MAC addresses that are allowed to receive an IP address from DHCP, assigned only from a specified IP pool.
Trusted DHCP servers - shows the trusted DHCP servers defined for this subnetwork.
Administration groups - shows the administration groups allowed to manage this subnetwork.
IP Matrix🔗
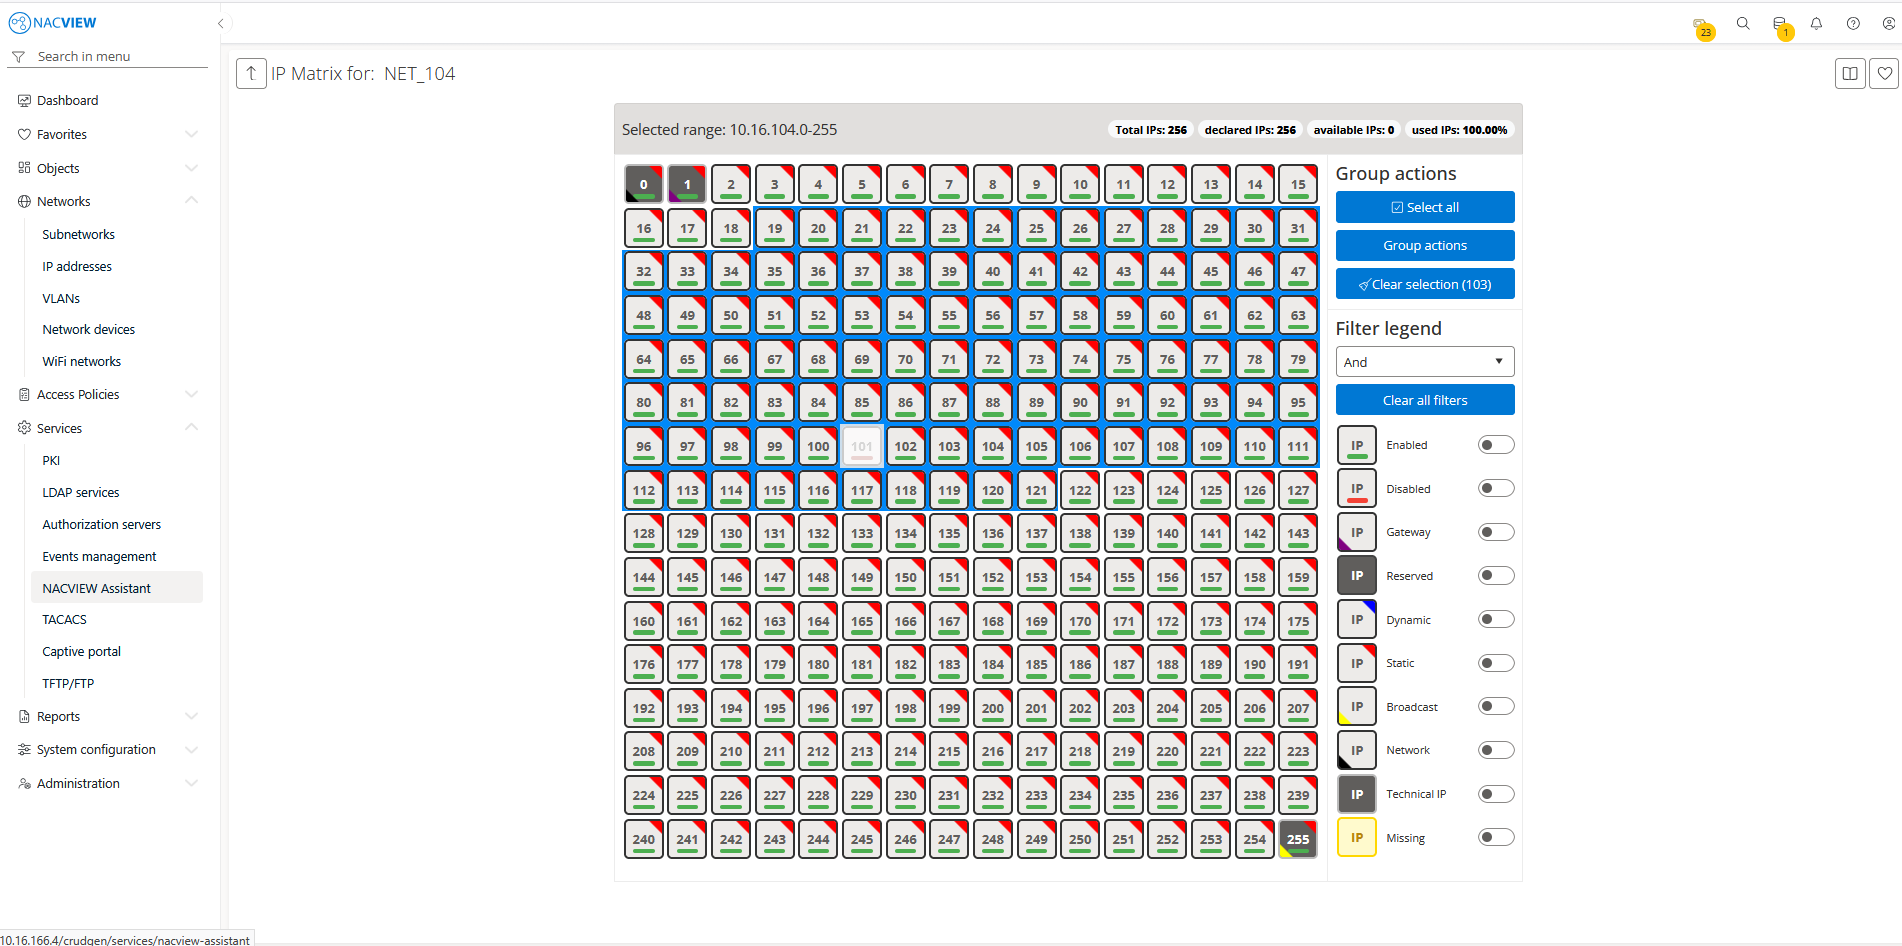
The IP matrix view (opened using the IP matrix button) displays every IP address within the
selected subnetwork as an individual, colour-coded cell - each cell is labelled with the last
octet of the address. IP addresses can also be selected by holding the Ctrl or Shift
key while clicking, in addition to using the Select all / Group actions / Clear selection
buttons described below. Above the matrix, summary counters show the Selected range, Total
IPs, declared IPs, available IPs, and used IPs (as a percentage).
Back button (↑, top left) is used to return to the previous view.
Group actions
Select all button is used to select all IP addresses currently shown in the matrix.
Group actions button is used to perform an action on the currently selected IP addresses at once.
Clear selection button is used to clear the current selection of IP addresses; the number shown in parentheses is the count of currently selected addresses.
Filter legend
The dropdown list (for example, And) determines how multiple active filters are combined. Each legend entry, such as Enabled, Disabled, Gateway, Reserved, Dynamic, Static, Broadcast, Network, Technical IP, and Missing, represents a distinct IP address status, each shown with its own colour marker in the matrix. Turning on a legend entry shows only the addresses with that status.
See also
For instructions on how to configure subnetworks step by step, see Configuration Guides → Subnetwork configuration.
Views & Actions
/admin-guide/network/subnetwork/ip-tile-list-custom