Identity🔗
Introduction to Identity
This section provides information about Identities, whose network access can be managed by the NACVIEW system. An Identity is a term related to a system user, extended with additional information related to a specific user. In addition to the first and last name, this information includes: e-mail address, login, password, account validity, assigned endpoints, and other attributes. This information can be used in the process of deciding whether to grant the identity access to the enterprise network.
System context: Identities can be created individually, imported in bulk from a CSV file into the local NACVIEW database, generated as multiple new accounts with a shared prefix (multi-create), or defined on external servers (e.g. AD, LDAP, Azure/Entra). The list of identities can also be exported to a file (Export). NACVIEW can synchronise with an external server and download Identity information from it. There are three types of identities: Standard (locally defined), External (synchronised from external databases), and Voucher (temporary accounts with defined validity periods). Similar Identities can be grouped (e.g. employees, guests, users logging in with a certificate, or members of a specific department such as HR or Marketing). Groups are created in Administration > Object groups. Identities can also be assigned to Organizational units - for example, Identities synchronised from an external database may already be assigned to a specific unit, or they can be assigned to local ones. New local Organizational units are created in Objects > Organizational units. Groups of Identities can then be used to create access policies (e.g. a policy for all Identities belonging to the Accounting Department).
Operational Example: When an employee from the Accounting Department connects to the corporate network, the system checks their Identity against the access policy defined for their group and grants access to the resources assigned to that department.
Toolbar🔗
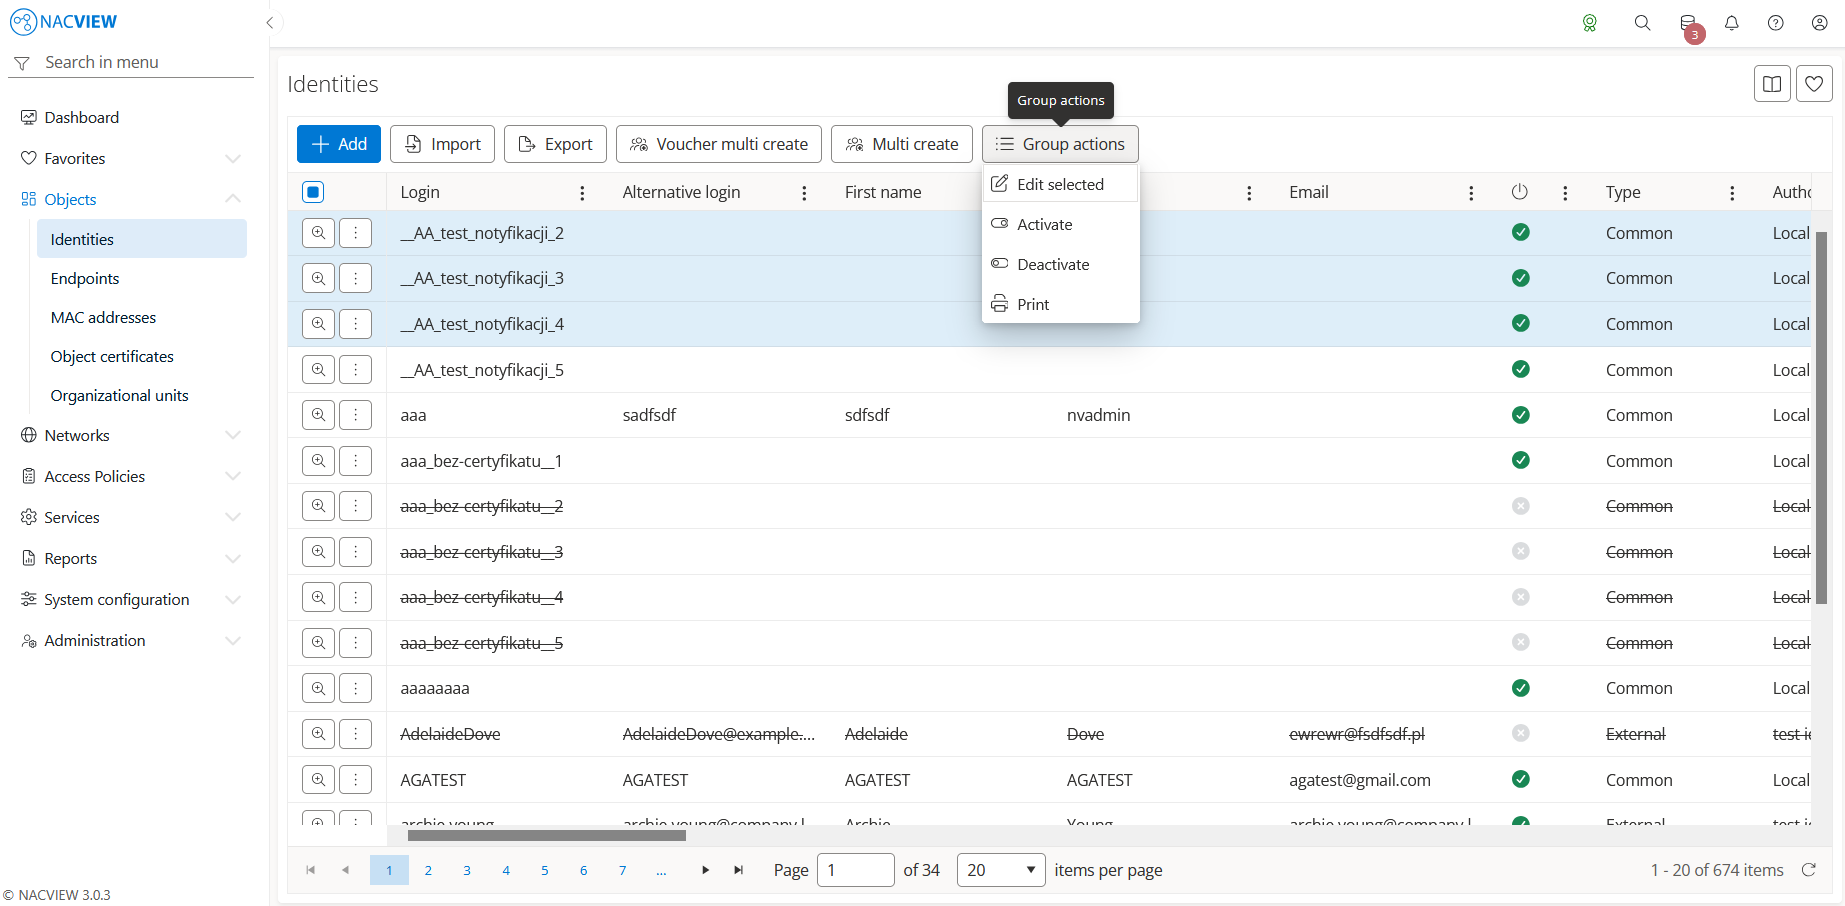
Add button is used to manually add a single new identity account.
Import button is used to import multiple identities from a CSV file into the local NACVIEW database.
Export button is used to export the list of identities from the NACVIEW database to a file.
Multi create button is used to create multiple new Standard accounts at once, based on a shared prefix.
Voucher multi create button is used to create multiple temporary Voucher accounts at once, with a shared prefix and a defined validity period.
Group actions button is used to perform an action on multiple selected identities at once. Identities can be selected by holding the Ctrl or Shift key while clicking. The available actions are: Edit selected, Activate, Deactivate, and Print.
The identity details panel🔗
The identity details panel (Details) opens when a specific identity is selected from the list. It displays all information about the selected account in one place, in read-only mode. The top of the panel contains action buttons for the selected identity (Edit, Preview, Certificates, Print, and MFA preview, with NACVIEW Assistant and Archive available under the more options menu), while below them the full set of the identity’s attributes is shown, including update data (Updated by), the identity type (Type, Voucher type), identification data (Login, Alternative login, Password), the account validity period (Valid from, Valid to), information about its link to an external authorization server (Authorization server, External integration ID/UID), personal details (First name, Middle name, Last name, Email, Phone number, Contact data, Identification document), the description, the status (Is enabled), additional custom attributes (Custom 1-4), and security settings (Failed login attempts, Max concurrent devices, Yubi token, Google MFA secret, NACVIEW MFA secret).
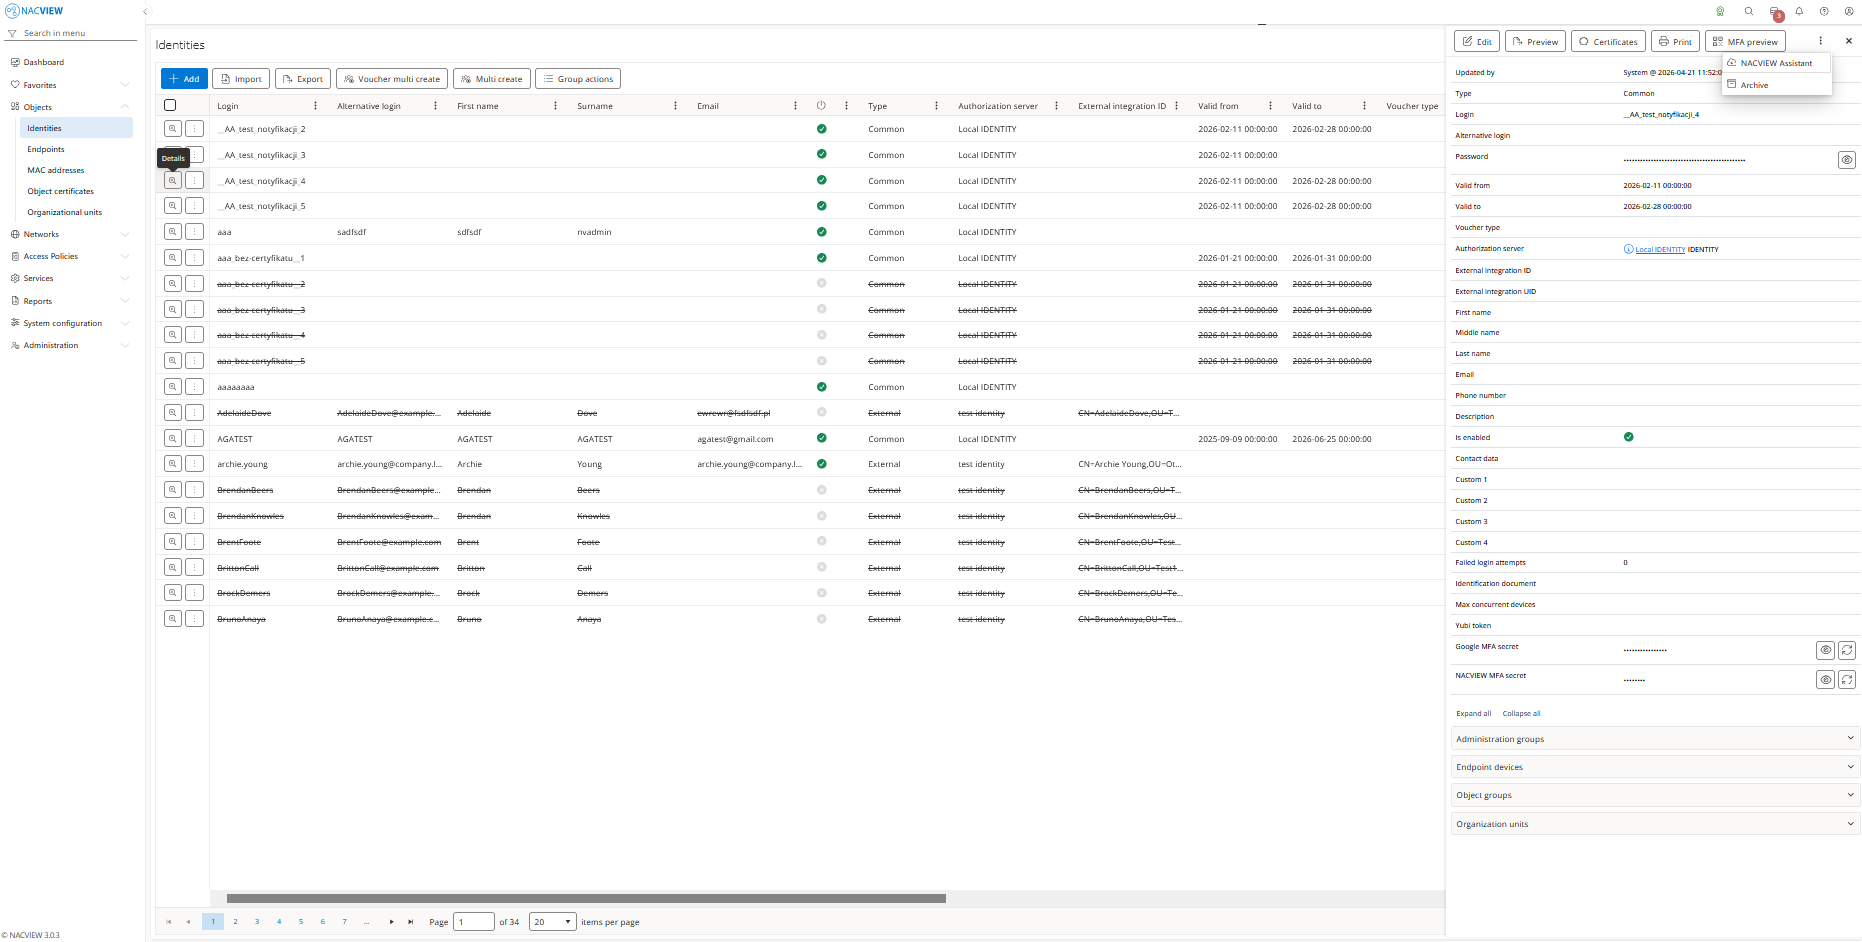
Edit button is used to edit the attributes of the selected identity.
Preview button is used to display detailed information about the selected identity.
Certificates button is used to manage the certificates assigned to the selected identity.
Print button is used to print the selected identity using a print template. The printed document can be used, for example, as a card handed to a guest or to an identity requesting network access, to be signed and confirmed.
Note
Print templates can be defined in System configuration > Printout templates.
MFA preview button is used to display the QR codes and OTP private codes (Google Authenticator and NACVIEW Authenticator) that the user scans to set up multi-factor authentication (MFA) in their mobile authenticator app.
NACVIEW Assistant button is used to display the NACVIEW Assistant configuration files associated with the selected identity.
Archive button is used to display the archive records related to the selected identity, showing when each record was created, by whom, from which IP address, and the object name and type.
Details🔗
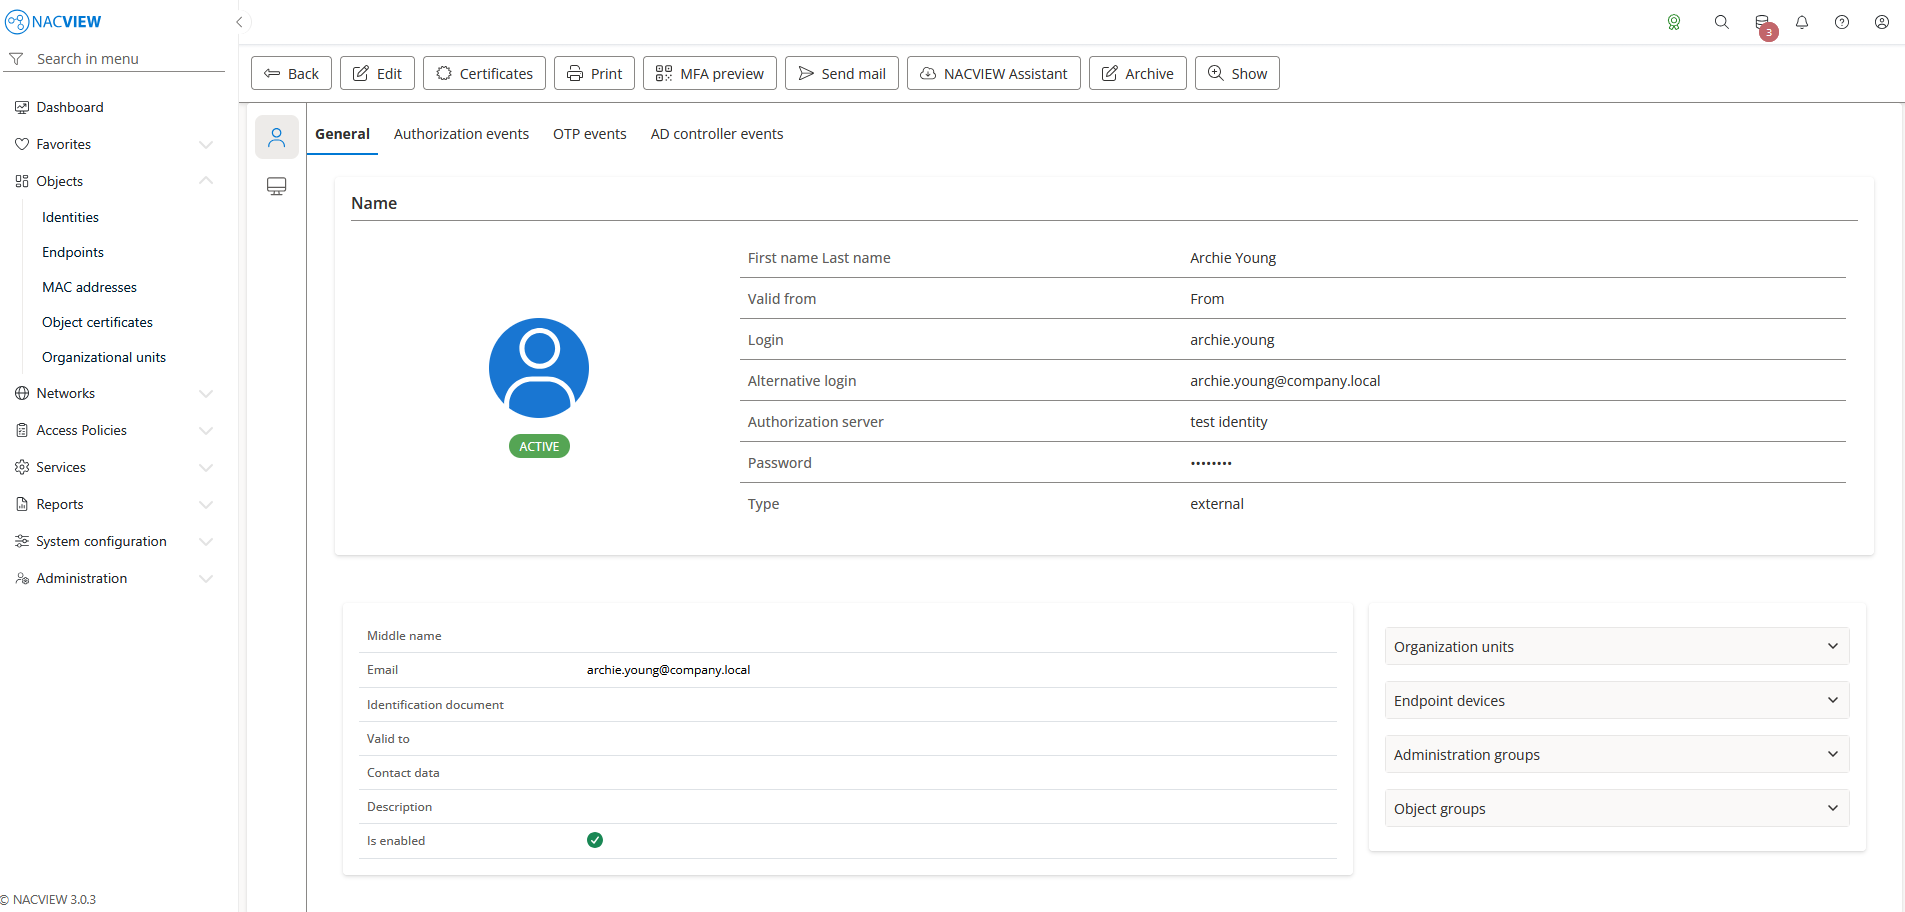
The detailed identity view opens using the Preview button in the identity details panel. The top of the view contains action buttons for the selected identity (Back, Edit, Certificates, Print, MFA preview, Send mail, NACVIEW Assistant, Archive, Show).
Back button is used to return to the Identities list.
Send mail button is used to send an email message to the selected identity. The view contains the following tabs:
General - displays the general information about the identity (personal details, login, authorization server, type, and status).
Authorization events - displays the authorization events related to this identity, shown as a table with columns such as Timestamp, Type, EAP type, User MAC address, MAC address, Username, and others.
OTP events - displays the one-time password (OTP) events related to this identity, shown as a table with columns such as Timestamp, Type, Username, Category, Policy rule, Src. IP address, and others.
AD controller events - displays the Active Directory controller events related to this identity, shown as a table with columns such as Timestamp, Event type, Target user name, Hostname, Category, and others.
Panels🔗
The following expandable panels are available at the bottom of the right-hand side of the details view:
Organization units - shows the organizational units to which this identity belongs.
Endpoint devices - shows the endpoint devices assigned to this identity.
Administration groups - shows the administration groups that can manage this identity.
Object groups - shows the object groups to which this identity belongs (used for policy configuration).
See also
For instructions on how to configure identities step by step, see Configuration Guides → Identity configuration.